

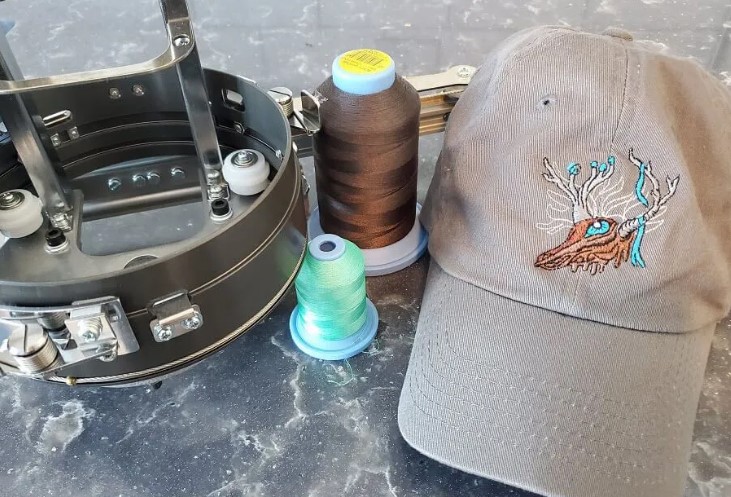
Did you know that nearly 80% of successful embroiderers choose embroidery digitizing services to digitize designs for caps? Caps not only hold a significant place in the embroidery industry but also provide an exciting canvas for creative expression. Whether you’re considering it for your business or personal enjoyment, mastering the art of cap embroidery is worth your time and effort.
Embroidering on caps, or what some call “beanies” or “toques,” shares many similarities with embroidering on other fabric surfaces. However, this article will focus specifically on the intricacies of embroidering on caps.
Understanding Cap & Hat Terminology for Embroidery
Crown
- The crown of a cap consists of 4, 5, or 6 panels, with the 6-panel configuration being the most common, especially in baseball caps.
Visor (Brim)
- The visor, sometimes referred to as a brim, bill, or visor, can be flat with squared-off or round shapes, or it may be curved. Typically, it is constructed from plastic or cardboard and covered with fabric. Embroidering on the visor requires a cautious approach, considering the capabilities of your embroidery machine.
Button
- The button serves to hold the cap’s panels together and can be made of metal or plastic, often covered with fabric.
Buckram
- Buckram is the backing material located on the reverse side of the front panels. It serves to stiffen the twill fabric and provides a stable foundation for embroidery. Buckram can be made from stiffened cotton fabric or plastic mesh. When working with caps featuring plastic mesh buckram, it’s advisable to use less dense embroidery designs to avoid creating bulletproof areas that might damage threads or needles.
Sweatband
- The sweatband encircles the inside of the cap and serves to absorb moisture while protecting the cap’s exterior from stains. When embroidering, take care to flip the sweatband backward to avoid embroidering over it. Embroidering on the sweatband can make the cap uncomfortable, reduce its effectiveness in moisture absorption, and create overly dense areas.
Eyelets
- Eyelets are small, perforated holes on the top of the cap. They primarily serve as ventilation but can also serve as useful guides for positioning your embroidery designs.
- Closure: Closures can take the form of adjustable buckles, like Velcro, or fitted caps that come pre-sized and don’t require adjustments. The curved opening at the back of the cap provides an excellent space for adding names, team logos, or other personalized details, making it a compelling selling point.
In conclusion, caps offer a versatile and popular canvas for embroidery work. Understanding the various components and terminology associated with cap embroidery will help you produce high-quality, comfortable, and visually appealing embroidered caps, whether for commercial ventures or personal projects. So, why not explore the exciting world of cap embroidery?
Selecting the Right Cap for Embroidery
When it comes to embroidering caps, the choices are as diverse as they are abundant. Perusing a cap catalog or website reveals a staggering array of options, encompassing color combinations, materials, crown heights, bill styles, back closures, and more. While the world of headwear boasts hundreds of styles and manufacturers, most hats generally fall into one of three main categories:
OPF (One-piece front) Hats for Embroidery
OPF hats are often associated with the “trucker” or “farmer” style. These hats feature a single piece of foam laminated backing, providing structural support, with the rest of the hat being made of mesh material. Embroidering on OPF hats is usually straightforward, thanks to their laminated backing and absence of a center seam.
Varsity/Collegiate Hats for Embroidery
Varsity hats fit snugly to the head and lack the laminated backing on the front panel. Consequently, they may move slightly during embroidery, making proper hooping crucial.
Sports Caps for Embroidery
Sports caps reign as one of the most favored hat styles for embroidery. These caps feature a center seam down the middle of the front panel (often referred to as the “Bermuda triangle of embroidery”) and a laminated backing, providing structural integrity.
Embroidering Caps: A Closer Look
When embroidering caps, placement options are varied, with some areas suited for embroidery before the manufacturing process (e.g., the bill). However, there are numerous options for embroiderers to explore. Multi-needle embroidery machines are typically equipped to handle embroidery on the front, sides, back of the cap, and even in between these areas.
It’s important to note that embroidering hats on a single-needle or flatbed machine is exceptionally challenging. To facilitate cap embroidery, a cap frame and preferably a multi-needle embroidery machine, such as the ZSK embroidery machine, are essential tools. If you’re interested in discovering which machines we recommend, feel free to consult our article on “What is the Best Embroidery Machine for a Home Business.”
Front of the cap is the most commonly embroidered area. Even basic cap frames are designed to accommodate front-of-cap embroidery. Today, commercial embroidery machines often employ wide-angle cap frames capable of rotating up to 270 degrees, allowing for embroidery on both the front and sides. This leaves the back of the cap, which many embroiderers address using a traditional round hoop.
Now, let’s delve into each embroidery location to understand the key considerations for achieving optimal results. While the cap’s construction plays a significant role in framing, the fundamental principles apply regardless of cap type. Let’s begin with the front and center.
Machine Embroidering the Front and Center of Caps
Embroidering the front of a cap is the most common and relatively straightforward placement. As previously mentioned, cap frames are primarily designed to embroider the cap’s front. The primary difference among ball caps lies in whether the front panels are structured or unstructured. Structured caps typically feature a fused buckram backing that provides rigidity to the crown. In contrast, unstructured caps, such as varsity and collegiate styles, lack this backing and are more flexible.
For unstructured caps, the use of cap backing (stabilizer) is crucial. Cap backing is a sturdy and heavyweight tear-away material that stabilizes the fabric of unstructured caps and helps maintain the cap’s shape during embroidery. Structured caps, on the other hand, do not require additional backing, as the fused buckram serves as a stabilizer.
Some caps fall into the middle ground, such as soft buckram or foam-backed caps. When working with such caps, it is recommended to use a piece of cap backing, resulting in excellent embroidery results.
In the case of structured caps with front-only placements, it may not always be necessary to attach the back clip to wide-angle cap frames. In fact, for larger designs, leaving the back clip off can provide flexibility to the cap and prevent distortion at the top of the design.
Embroidering caps requires attention to detail and an understanding of the cap’s construction, ensuring that your embroidery projects turn out beautifully and maintain their shape and quality.
Embroidering the Sides of Hats
When it comes to side placements on caps, the use of the back clip(s) becomes essential. Back clips serve a crucial role in securing designs for side placements on caps. The design and structure of wide-angle cap frames can vary between brands. The primary distinction lies in the back clips, with some frames featuring a single large clip and others having one clip on each side at the back. Many brands opt for multiple clips resembling office supply binder clips. Regardless of the clip type, using them is paramount when embroidering side placements on caps. Failing to do so can result in a design that appears to slant downhill.
Unlike front placements where cap backing may be optional on certain caps, it is an absolute necessity for side placements. The sides of caps lack the fused buckram found in the front, which means they require stabilization. For regular twill caps, a single piece of cap backing suffices.
Pro Tip: For Flexfit and similar stretch-to-fit caps, it’s advisable to use at least two pieces of backing, if not a cutaway backing.
The same principle applies when working with mesh caps. Embroidering on mesh caps is indeed possible with proper stabilization, as the backing provides the necessary support to keep the stitches intact. In this case, a cutaway stabilizer is recommended.
Securing the backing in place while hooping the cap’s side can be a bit challenging. It may be tempting to tuck it under the frame, but this won’t provide a lasting hold as the frame won’t keep it in place after hooping. Instead, the cap should be hooped with the backing on top of the frame. An effective workaround for this is to use double-sided tape, like carpet tape commonly found in home improvement stores. Place it on the side of the cap frame, remove the backing paper, and affix the cap backing onto the tape. This method ensures the backing stays in place while hooping and can be easily removed from the frame afterward.
Embroidering the Back of Hats
Embroidering the back of caps is a relatively straightforward process. While various attachments are available to assist with this placement, a simple and effective solution is to use a standard small round hoop. Most machines come with a 12cm or 4.5-inch round hoop, which fits the back of a cap, especially those with openings, perfectly. If necessary, the cap back can be hooped on a table corner, eliminating the need for specialized hooping devices.
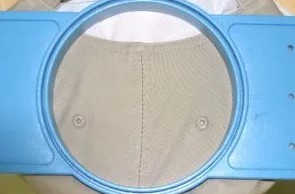
To align the back, make use of the marks typically molded into the hoop. The center seam of the cap should align with the marks at 12 o’clock and 6 o’clock, while the edge of the cap’s opening should align with the other marks.
To ensure proper stabilization of the back, ensure that the piece of backing covers the entire hoop. While the cap back may not cover the entire hoop, the backing must extend to provide adequate stabilization.
Hoop Your Cap Hats for Embroidery Success
Embarking on an embroidery journey with caps and hats requires correct hooping as a foundational step. Whether you’re a novice or an experienced embroiderer, it’s universally acknowledged that cap hooping can pose challenges without proper guidance. Frequently, individuals encounter failed embroidery projects, often attributing the issues to their machines, unaware that improper hooping can be the root cause. As with any embroidery endeavor, the quality of your hooping directly impacts the quality of your embroidery.
Let’s delve into a tried-and-true hooping technique for caps and hats, based on the approach employed by the Embroidery Legacy during its operation of two of North America’s largest embroidery production facilities in the 1990s. To follow these steps effectively, you’ll need a cap hooping accessory, comprising three key components:
- Driver: The driver fits snugly over the top of the machine’s arm.
- Cap Frame: Your hat will be attached to the cap frame.
- Jig: The jig facilitates the attachment of the cap frame for precise hooping.
By following these instructions and employing the right accessories, you can ensure that your cap is hooped correctly, setting the stage for successful and flawless embroidery results. I recommend you to test our cap digitizing services.